Sunday, July 3, 2016

Bulletin Boards

I've taught several grades from Kindergarten to 7th grade Math. Each grade had something
I enjoyed about it, however my favorite grade level was 7th grade Math. I enjoyed decorating my class for Kindergarten the most, as I was able to let my creative side take over.

I really enjoyed thinking of ideas for different bulletin boards. Here are a few of my favorites:


Starbucks Themed Bulletin Board

 Starbucks is a FAVORITE of mine (especially the Caramel Light Frappuccino).
There were many days when Starbucks helped get me
ready for my day. (I had a 6:45am start time!)
I made a Starbucks themed Christmas tree this past Christmas. I'll share in
another post (it turned out so CUTE!).
 
(This was my inspiration, but I was unable to locate who created it to give
credit. I found it on Pinterest.)
 
I located something similar while searching online and this
was my interpretation. I created Barista Name Tags for all the math
teachers, made mini latte cups, a large focal latte cup, and then
added glitter paper (my favorite! - everything looks better with a little sparkle)
as a background where we could put up "STAR" student work.
 
The large cup I made by pulling up the cup template and projecting it onto my
dry erase board. I put up two pieces of white post-it poster paper, and traced
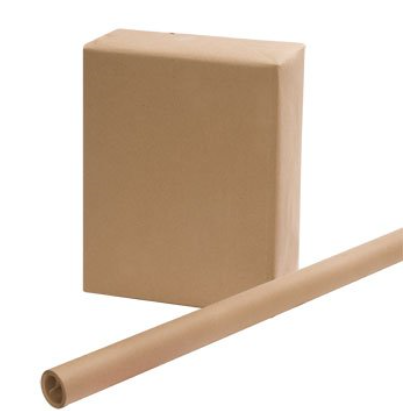
the cup. I made the cup holder from brown wrapping paper (paper bag paper). I made
 the large logo and printed it out. Attach the brown paper to the cup, then center
and attach the logo. Finally, laminate your project.
 
Here is my template for the smaller cups with instructions.
 
 
Large logo:
 
Barista Name Tags:
 
 
Thanksgiving Themed Board
 

I drew a basic tree trunk, sprayed it with spray adhesive and put
on the brown glitter. The leaves I bought at the local teacher supply store. I
found my favorite glitter card stock at the local craft and hobby store. I
purchase it when it's on sale. The pumpkins were used as a background
to display student work.
 
 
Mardi Gras Bulletin Board
 
Another fun board! The first time I saw a Mardi Gras bulletin board was when I
went to pick my 3 year old up from preschool. The teachers had made a super
cute bulletin board with construction paper for the king cake, and had
pasted the kids faces onto the little babies (it was so cute to see my little ones'
face on the baby). This was my variation on that bulletin board.
 
How it was made:
I took brown paper on the roll and cut off pieces that were about 20 inches wide. If
I had to do it over again I would make them wider (I like a fat king cake), probably
36 inches wide. Next, I scrunched the paper a bit to give it a crumpled look. Then, I
connected the ends and stapled them together, basically making a tube. The number
of tubes you need depends on how wide your king cake will be. For the corners,
I pleated the paper then stapled until I had a nice curve.
 
To attach the tubes onto the bulletin board I put the seam (stapled part) on the
bottom (facing the bulletin board), and put my arm inside the tube and stapled
it onto the board. After all of the sections were attached, I needed to put on
the icing. The icing were pieces of white tissue paper that I cut with
a scalloped edge. I sprayed the sections with spray adhesive and sprinkled
my glitter onto the paper. Then I sprayed the king cake with the spray adhesive
and lightly pressed the tissue paper onto the brown paper. I continued to do this
until all the sections were covered.
 
The next step was to put up a border. I wanted something flashy, so I pulled out
the deco mesh from my craft supplies. I cut 6 inch sections and bunched and stapled
it onto the board. I had some confetti that I wanted to use, and the spray adhesive
came in handy again. I sprayed a section of the board and took a handful of
confetti and pressed it onto the board until it looked like I envisioned it.
 
The last step was what made this board so stinking cute! I took pictures of all the kindergarten
classes (I needed small faces, so group pictures worked perfectly). I printed the pictures, cut
out the tiny heads, then hot glued the faces onto the king cake babies. I hot glued each
baby onto the bulletin board, and voila! The kids LOVED walking by and
looking for their baby.


Pete The Cat Board
 
This was a quick board that was put together last minute. I found an image of Pete
online and used the projector to project the image onto the dry erase board. I taped up
some navy butcher paper and traced Pete. I cut him out and painted on his eyes and nose.
The shoes were clipart that I purchased (the link is listed below). I printed the shoes
onto cardstock and cut them out.
 
(I was not able to find the exact link to where I purchased these,
but I did find a store that had very similar shoes. I've linked to
that store.)


Saturday, July 2, 2016

Wall Art Project

I was searching for a piece of art that would take up a good amount of space, but not break the bank. I found something that I liked and the tutorial that went along with it, but I didn't have the time needed to complete all the steps involved. This is what I found (I love it and will work on it at a later date).

These polished damask wall panels were found at www.horchow.com 
and after some additional searching I located them at Neiman Marcus
 

I found this awesome project on Pinterest, and followed the link
to Knock Off Décor. It looks like the original project was done by
 
I don't personally own a projector, so I used one at the school I worked at. I would
come in early and stay late to trace my stencil. It never turned out how I would have
liked and I really didn't have the time to dedicate to proper tracing, and painting. Our
home flooded and I was busy dealing with mushy drywall and wet insulation (yuck!).
 
Since I had decided to put this project on the back burner, I still needed a large
inexpensive piece of art to use as a focal point in my living room. Off to
youtube.com I went, searching for wall art tutorials. I was fortunate enough
to come across this video by Art Fusion Productions. I really liked
some of the results Glenn Farquhar's students had using his tutorials.
 
(This painting is a favorite of mine...I'll use a different
background color).
I purchased his tutorial, which was very well done and easy to follow,
and I started working on my wall art.
 
I found this great website to purchase your canvas at for very reasonable prices!
 
Here's a picture of my canvas once I have the textured flowers on it:
 
Here is my finished product:
 
Finished product on display:
 
I really enjoyed this project! I was definitely on a time crunch, but was able to complete it within 5 days (you need time to allow it to dry). Go check out Art Fusion Productions there are
many great tutorials there.


Staging to sell.....round 2

I've had a second opportunity to stage a home to sell and would love to share. This time I have before and after pictures! When I think about color scheme and how  I want to decorate when staging, I focus on keeping the area uncluttered, I use neutral colors and add "Pops" of color.

Living Room from entrance
BEFORE
 
AFTER
 
  
I purchased the rug from Overstock.com, I ordered custom pillow covers
for both the large and small pillows. The curtains I found on Amazon.com
and are a beautiful plum color. The wall art I made myself (I found a
fabulous site where you can purchase a tutorial. I will link below).


One thing that I purchased, but did not finish in time to use
was this beautiful fabric from Fabric Mart on Etsy.com (can you see a
common theme here? Yes, I love etsy.com!)
Isn't this just gorgeous! I am planning on making an
ottoman with it and coordinating valences. I'll post
pictures once I'm done with the ottoman (maybe a
tutorial).
 
 
The wall art was so much fun to make! I found the tutorial
on youtube.com and was lead to Art Fusion Productions website


BEFORE 
 Living Room view 2 - towards the front door
 
AFTER


Dining Area 
 
AFTER 
 
 
I realized that I was one set of curtain panels short, so my mother
made valences for me (thank you so much mom!). Another view of
my floral wall art (I'm definitely not an artist, but I really
had fun doing this, and I think it turned out pretty cute. I changed
the chandelier and staged the table with plum dinner plates, and a
plum floral pattern salad plate. The design for the salad plate was
discontinued, but I was able to find some at www.replacements.com.
I made the floral centerpiece and found really cool plum glasses.


I've really enjoyed blogging and sharing my thoughts and ideas. I'll finish
this house on a later post.


Staging to Sell....round 1

I sold a home a year ago and was very fortunate to have a quick sale. When I decided to put the home on the market, I knew I needed to do something with all the everyday clutter that comes with having a family. Over the course of a month we cleaned out closets, donated items to Goodwill, threw things away, took down personal items, and put things in a storage unit. I purchased a few items to make the house pop, but basically used what I had. Here are some pictures with links to the purchased items. I'm sorry I don't have before pictures, but I never thought I'd be writing about what I did.

I was fortunate that when I purchased this house it had a nicely
landscaped lawn. I'm so thankful that we found a great lawn service
to maintain it. The only thing I did to the front was to add
hanging baskets with brightly colored flowers.
 
 
Living Room:
In this room I ordered custom made pillow covers (the large white ones
with floral designs on them). I ordered smaller pillow covers to tie in
the gray/teal curtains, the gray/teal curtains, and the 3ft by 3ft wall
art over the mantle. I loved the gray/teal curtains and how they
made the room pop.


Kitchen and Dining Area


On the kitchen window and the dining area windows I
used an extra gray/teal curtain that I had ordered and had my
mother make matching valences. I bought placemats from Target,
and then "staged" our table using our dishes (Target). I found the
cute teal vase at Hobby Lobby and put some bright
flowers in it to add some color.
 
Master Bathroom:
 
Now our master bathroom was definitely not the most updated
bathroom. However, I made the best out of the situation by
purchasing a nice neutral colored shower curtain, and putting
some flowers on the counter. I bought some matching towels
to hang.
 
Hall Bath
I loved this bathroom. The yellow made it so bright and happy.
The picture in the mirror was one I had before I staged the house,
but I love it so much I have to give a shout out to London Bridge
Children (on etsy.com). The shower curtain is from Target.


Little Ones Room:
Not much was done in here, other than a LOT of de-cluttering!
Someone gave Samantha the chandelier as a baby shower gift. We
took out the light wiring and use it as an accent in the room. The
wall art are lines from "You Are My Sunshine". I added some
fake flowers for some color and made sure the room stayed clean.